Project Uruborus
The Portal Technology of Project Uruboros
The core mechanic of Project Uruboros is the player’s ability to rearrange the connectivity of portal doors, so implementing a prototype portal system was a natural starting point for the project. In this post I will give a high level overview of the non-standard technique that I landed on and explain why I think it is the correct approach for the project.
From the outset, there were qualities that I wanted the portals to have. First, the portals should be seamless, with no visual tells or graphical artifacts when the player looks into or walks through a portal. To the player, their avatar does not ‘teleport’, but simply walks naturally from one room or space into another.
Second, the portals are going to do weird things with rotation, gravity, scale, and more. The player will enter a sideways portal door, and walk out onto the wall of the room on the far side. Portals that affect scale will change the avatars’ size relative to their environment, and can even invert scale to change the handedness of the space.
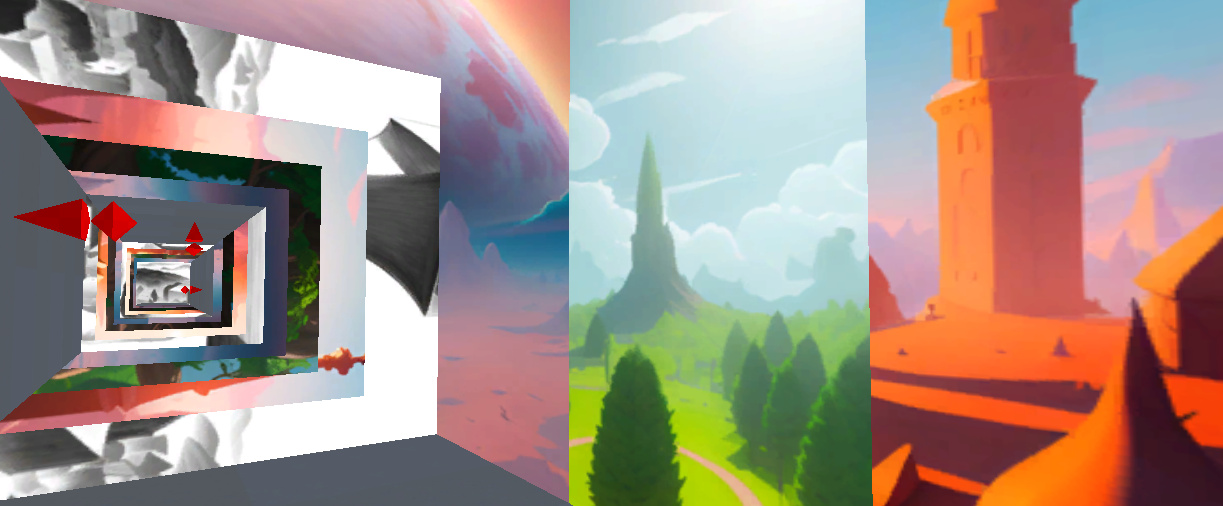
Lastly, there will sometimes be a lot of portals on screen, including infinite loops of nested portals stretching into the distance. This last requirement turned out to be the primary motivation to depart from the standard approach.
A portal like this should be thought of as two distinct features. The ‘Teleport’ feature moves game objects from the portal inlet to the portal outlet. This is not at all hard to implement, as Unity’s Matrix4x4 class makes it trivial to transform an object’s position, rotation, and scale from one spatial context to another.
The ‘Rendering’ feature, the system that lets the player see through to the far side of the portal, is where things get tricky.
The standard approach to rendering portals in games is something that I like to call the ‘chalk drawing’ technique. A second game camera is used to render a view looking out of the farside of the portal (what I hereafter will refer to as the ‘portal outlet’). The image captured by this camera is then used to texture the nearside of the portal (the ‘portal inlet’), much like an illusionistic chalk drawing you might see on a real world sidewalk.

Like with teleportation, matrix math is used to position the second camera so that its position relative to the portal outlet matches the main camera’s position relative to the portal inlet, ensuring that the player sees the space on the far side from the appropriate perspective.
This technique is ubiquitous in games with see-through portals, but it has one significant drawback. Rendering additional cameras places a multiplicative burden on the GPU. Nested portals, such as might occur in an endlessly looping corridor, are particularly bad. To maintain proper perspective, each layer of the nested portals requires its own camera, rendered farthest to closest, and in between each camera rendering, the texture of the portal inlet will need to be overwritten. My understanding, based on conversations with programmers, is that this cycle of alternate rendering and texture overwriting can be very suboptimal for the GPU.
As a consequence, a game with portals can only spend a fraction of its GPU budget per camera, limiting its graphical quality. These games will also need to limit the maximum number of portals displayed at a given time, usually to a number in the single digits.
As the name Uruboros suggests, I very much plan to display looping spaces and deeply nested chains of portals, making the multi-camera approach a very poor fit for the project.My solution was to render duplicate representations of the spaces on the far sides of portals, by passing mesh and material data into Unity’s Graphics.RenderMesh function. To explain this in more detail, let’s walk through how this works for static objects (i.e. the level geometry seen through the portal). I’ll save topics about non-static objects and lighting replication for later posts.
Prior to Runtime:
- I register each piece of static geometry in the level, adding them to a dictionary and using object IDs as keys. This information includes a reference to the object’s shared mesh, information about its texture and tint, and its transform in worldspace.
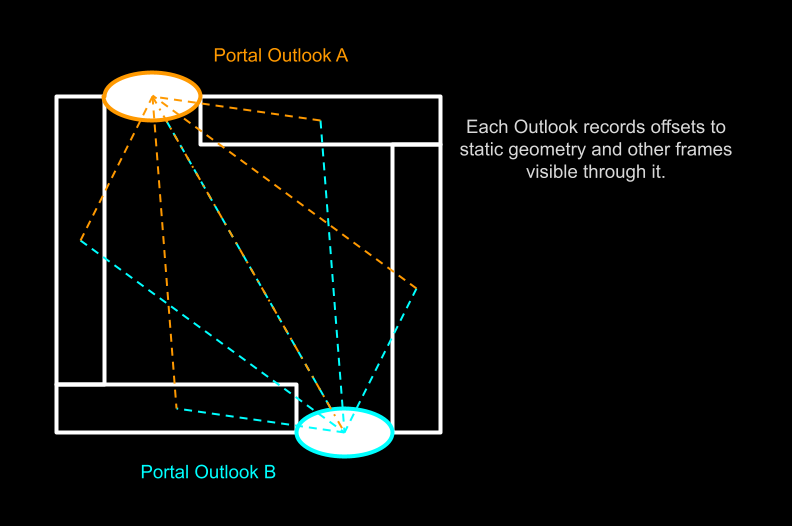
- Next each door frame where a portal might exist, I have the frame compile a list of objects that can be seen by someone looking through the portal. Elements in this list contain the object’s id key, and a transform matrix describing the object’s position relative to the door frame.
At Runtime:
- Upon level load, whenever the player walks through a portal, closes a portal, or opens a portal, the rendering system compiles a tree of ‘space nodes’.
- The root node is the space that the player’s avatar currently occupies. Each child node is a space seen through an open portal.
- Some culling is done during compilation, to exclude nodes that the player can’t possibly see from any position in the root node.
- Each space node is based on the door outlook data created in step 2 above. Using the space node’s root position and the object matrix offsets in the door frame’s data, each space node creates a list of object instances and their worldspace transform.
- The visibility of each space node is confined to the portal’s plane by way of the stencil buffer. This is another topic for a later post.
- Each frame, the system loops through the list of space nodes and passes each object instance into Graphics.RenderMesh().

Rather than generate GameObject instances for these spatial copies, I instruct Unity to render them via script. Whereas the cost of additional cameras is multiplicative, the cost of each space is simply a function of the number of meshes it adds to the rendering queue. With some culling checks during space tree construction, it’s possible to greatly reduce the cost of each space node, and allow infinite corridors to vanish into the distance while spending very little gpu time on distant space nodes.
Benefits
- Low Rendering Cost per Portal
- Rendering cost is proportional to the complexity of the geometry visible through the portal, so this approach can display many portals at once, provided some measures are taken to optimize the geometry.
- High Level of Control
- A lot of portal mechanics I might explore in the future–time dilation, time of day, color subtraction, etc…–are either impossible or much more complicated with conventional portal tech.
Drawbacks
- Coding Overhead
- As a non-standard approach, the system took time to implement and troubleshoot.
- Some additional code is required whenever I want to implement a new type of rendered element. Currently I have code to make meshes compatible with the system, but I will need to do work to make sprites, text displays, and particle systems compatible.
- Level Design Overhead
- Until tools and workflow automations are implemented, technical familiarity with the rendering system is required to construct a game level.
Overall I’m very satisfied with this solution and looking forward to refining it. Stay tuned for more blog posts in the future on topics like lighting replication and the use of the stencil buffer.
Leave a comment
Log in with itch.io to leave a comment.